


Join us at Into Indie Games as we explore Central in Control Resonant.
Central is the second area you’ll explore in Control Resonant, and this guide will help you find all the most important things around so you don’t miss anything.
This is a work in progress article, as we may have missed some things given that this is Remedy and they love their secrets, so keep checking back as we continue exploring.
Table of contents
Large Resource Crate Locations – Health Upgrade
#1

Next to the Vendor of Central. Check the Vendor location below.
#2


During the Clear The Supply Route objective in the Welcome To Manhattan quest, you will reach the subway station that takes you to the FBC Field Office.
Just before you exit the station, head into the small room to the left to find the crate containing the Health Upgrade.
#3


West of the Field Office, you can find an Urban Fresh supermarket. Head inside to find another crate containing a Health Upgrade.
#4

During the Central Resonant main quest, you will need to destroy the lava globs to gain entrance. As you make your way to the glob along the right path, you will encounter a small living space.
In the same room, there is a crate that will grant you another Health Upgrade.
#5

During the Power Lines main quest, you will need to reroute the Vanished Station. From Platform A, take the stairs up and move the charge to the power cell next to it.
This will open the room where the units needed for the puzzle are located. If you go to the end, you will see the Health Upgrade crate.
Large Resource Crate Locations – Power Upgrade
#1


During the Clear The Supply Route objective in the Welcome To Manhattan quest, you will arrive at the cellar where you need to use a power charge on one of the two doors.
Use the charge to power the regular door on the left to find the Power Upgrade.
#2


There is a crate inside the Patterned Factory on the upper floor, but to access it, you will need to move the charge to the door’s power cell.


Outside the factory, head to the Power Core Station and grab one of the charges there. Run directly inside, jump up, and hit the power cell to charge it.
This will unlock the room, allowing you to obtain another Power Upgrade.
#3


After you complete the Evacuation Procedures main quest, at the end, you will be granted a Level 2 clearance keycard.
Head back to the Field Office, and to the west, you will be able to unlock the R&C Storage room. Inside, you will be able to get a Power Upgrade.
Vendor Location


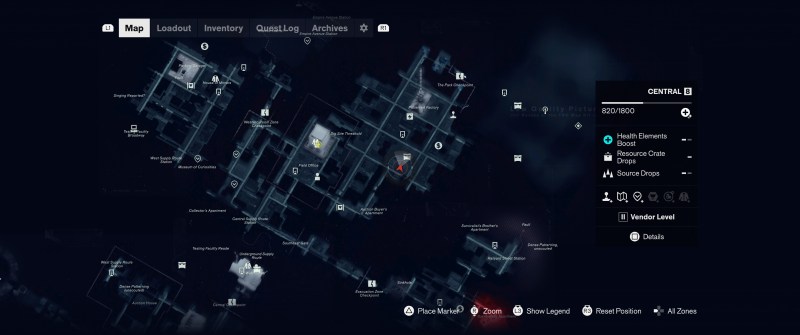
The Vendor of Central is located to the very east part of the map on the rooftop of the building there
Terminal Location


The Terminal in Central is located in the Field Office area, just northeast of the sensor used to reveal the map. Head inside the building, and you will see it directly in front of you.
The questions it has this time are different. Below, you will find the answers we picked.
Q: Allegedly, you are a former host (Carrier? Avatar?) of the Hiss. Is this true?
A: Yes.
Q: The Hiss are extradimensional resonance. Allegedly you are immune to it. Is This because of your relationship to Director Faden?
A: Yes.
Q: There is concern that you are “just a meat puppet” worn by the Hiss. Are you actually Dylan Faden?
A: Yes.
Secret Location – Wear’Em & Wash’Em Laundromat

The Wear’Em & Wash’Em laundromat is labeled as a secret in Central and is located directly east of the Field Office. When you first arrive, you will notice that it has a Hiss barrier blocking the entrance.
To get rid of the barrier, you need to destroy all the Hiss Nodes connected to it. Luckily for you, there is a red trail that will guide you toward these Nodes. This one has four.
First Node: Just on the opposite side of the laundromat.

Second Node: On the rooftop to the northwest, behind the sign.


Third Node: Behind the building where the laundromat is located, tucked into a corner.


Final Node: Just northeast of the laundromat, on the rooftop.


Once you destroy all four, the barrier will be lifted and you can access the place.
Puzzle Solution

Now, this was just the easy part. In front of you, you will find a bulletin board with two notes on it.
The one you need is labeled Laundry Puzzle, and it’s your hint for how this thing works. Basically, this drawing is a top-down map of the laundromat floor.
Each line of text on the paper corresponds to one row of washing machines, starting from the front entrance and working back toward the office.

The digits on each line represent the physical machines in that row from left to right:
- 1 means power ON, which means the machine needs to be turned on.
- 0 means power OFF, which means the machine needs to be turned off.
So all you need to do is match the 1 with the 1 and the 0 with the 0. Got it? I don’t know, it sounds weird, but I wanted something fun.
Before you start fiddling with the puzzle, make sure to turn OFF every single machine so you can follow our solution easily.
| Row 1 | 0001000 | Turn ON the 4th machine. |
| Row 2 | 001100 | Turn ON the 3rd and 4th machines. |
| Row 3 | 100001 | Turn ON the 1st and 6th machines. |
| Row 4 | 000000 | Leave all machines OFF. |
| Row 5 | 000000 | Leave all machines OFF. |
| Row 6 | 000000 | Leave all machines OFF. |
| Row 7 | 100000 | Turn ON the 1st machine. |

Once the last switch is flipped to match the note, the secret door in the back room will unlock automatically.
Go downstairs and get your Health Upgrade from the machine. There are also collectibles that you can grab.
Dog Location


The mysterious dog can be found on the rooftop at the very east of Central. Interact with the dog, and then you’ll need to find his dinosaur toy.


If you look below where the red lasers are, you will notice that the toy is by the door with the Dog Shelter sign. Pick it up and put it back in the dog’s bed.
Dylan’s Sketchbook Location


To the east of the Field Office, you will find a blue tarp in the small yard ahead. Interact with it to start the sketchbook. It will also be marked with a question mark as a secret on your map when you are close.
For this one, all you need to do is place all three cats next to their bowl and the basket on the left side. Dylan will make a comment that it’s correct, and then you can proceed to draw it.
Camera Location
#1

From the Fast Travel Door at the Watchtower, head to the lower level where the elevator is. On the right side, you will find some stairs leading down, so follow them to the bottom.


At the bottom, head into the room with the red light and climb up the scaffolds. If you continue forward, you will see a camera, and it will freeze you and the time around you.
After a few seconds, you will be back to normal, but the camera will disappear. Dylan tries to get Zoe’s help according to this, but she seems not to know about it. She suggests sneaking behind it.

Before you start the process again, make sure you are away from the camera’s location. You will hear a click sound, which signals that the camera has returned to its location.
Now, head back to the scaffolds and climb up to the ground level, but don’t move forward. Instead, look up and you will see a hole in the ceiling.

Climb up and follow the path without falling down until you reach the end. Drop down and you will find yourself directly behind the camera. Interact with it and it will still disappear.

Each Zone has two camera locations that you can find, and they usually require you to have your traversal abilities unlocked. Some of them also require special combat abilities.
This is the first camera we found, so we missed the ones in Downtown by the time we were writing this article.
#2


Southwest of the Field Office, if you climb up to the rooftop and head north, you will come across an open door where the camera is. If you run toward it, it will freeze you and disappear until it returns.

What you need to do here is simple: go inside the building and head to the ground floor, unlock the door there, and exit the building. This will cause the camera to reappear.

Now, when you head back inside, you will have to defeat some enemies. Defeat the enemies, then climb up to the rooftop and interact with the camera.
Taxi Location


North of the Field Office, at the end of the alley, you will spot a taxi parked there. This was our first one, so we didn’t know what to do with it. We’ll explain it as if this is your first time finding a taxi.
Report the Taxi to Zoe if it’s your first time finding one, then get inside the car. This will teleport you to a different part of Manhattan.

From a distance down the alley to the left, you will hear a phone ringing. Head there and take the call. It seems the caller, Mia, is stuck because of this taxi.

Head back to the main street, where you will find several parked taxis.
The puzzle here requires you to enter the correct taxi by playing a game of “spot the difference.” The right vehicle is the one that stands out from all the rest.

You need to pick the correct taxi three times to exit this Threshold. For this one, you need:
- First Taxi: Pick the taxi that has the lights on alongside the sign.
- Second Taxi: Pick the taxi that has the sign light on.
- Third Taxi: Pick the taxi that has all the lights on, front, rear, sign, headlights, all of them.
Testing Facility Location

The Testing Facility in Central is located to the northeast, just past the Vendor, but getting to it can be tricky. While you may see the icon on the map, you always need to find a different path to reach it underground.
Just north of the Vendor, you should come across a construction site. Go underneath it and use the pipe to reach the facility.


This is the first facility you will find, so we’ll explain how they work here. To reach each facility, you usually need to find a pipe that will take you underground, and these are generally found somewhere around the area.

Each facility has one of two different puzzles, either the Charge puzzle or the Soda Dispenser puzzle. For this facility, you will need to complete the Charge puzzle.
The puzzle has four Charge cores, but only two of them have charges at any given time.


Interact with the switch to start a 60-second timer, then keep moving the two charges between the cores so they do not overload.
A core with a charge will appear blue, while an empty core will appear red.

As the timer runs, the cores will start blinking to indicate where you need to move a charge. When a blue core starts blinking, take the charge from it and place it into a blinking red core.
Keep doing this whenever another core starts blinking, rotating the two charges between the four cores until the timer finishes.

Once the timer is up, all four cores will turn green. Interact with the lever again to open the door, then enter the room to find a collectible note alongside a Power Upgrade.
Arcade Location


The Arcade machine in this Zone only becomes available once you reach Zone Level 4.
It’s located just east of the Patterned Factory, inside the Urban Fresh supermarket.
Side Quests
Panopticon Service Request – Langston


Langston can be found just to the east of the Field Office. Speak to him, and he will ask for your help setting up the security system and moving an Altered Item inside the Panopticon.
We are still working on finding more Side Quests in this area and adding them to the article.
And with that, we wrap up our Central walkthrough for Control Resonant. Thanks for checking it out!
MORE OF INTO INDIE GAMES
Explore additional walkthroughs through the links below:
Into Indie Games Homepage
Twisted Tower – Walkthrough Hub
Moss: The Forgotten Relic – Walkthrough Hub
007 First Light – Walkthrough Hub
MOUSE: P.I. For Hire – Walkthrough Hub
High On Life 2 – Walkthrough Hub
Crimson Desert – Walkthrough Hub

Former Staff Writer at TheGamer, with over 1,000 published articles covering everything from major AAA titles like Call of Duty, Elden Ring, and Dragon’s Dogma 2 to trending indie games like Blasphemous, Palworld, and Kingdom Come: Deliverance 2, and many, many more titles!


