Aug
Verne: The Shape of Fantasy Walkthrough – Chapters 2 & 3
Verne: The Shape of Fantasy Walkthrough
- Chapter 1: An Ocean of Despair
- Chapter 2: Diving into Memories
- Chapter 3: An Extraordinary Voyage & Aftermath of the Inevitable
- Chapter 4: In the Entrails of the Mystery
- Chapter 5: In the Depths of Imagination
- Chapter 6: A Slippery Truth (Coming soon!)
- (More parts coming soon!)
Stuck in Verne: The Shape of Fantasy? Check out our Verne: The Shape of Fantasy Walkthrough to complete Chapters 2 and 3 of the game.
Welcome to the Into Indie Games walkthrough for Verne: The Shape of Fantasy.
For information on Verne: The Shape of Fantasy beyond this walkthrough, check out the official website here.
Chapter 2: Diving into Memories
After the conversation ends and you regain control of Verne, go left and exit the room.
Keep going left, past the organ and up the stairs. When you approach the elevator below the Air Room, Verne will comment needing to see Nadine in the Bridge.
Take the nearby ladder up, then take the Air Room ladder up as well.

Go left past two doors to the bridge and talk to Nadine, who is sitting before the window.
Now return to the elevator below the Air Room and use it to go to the Doc/Core deck.
On this deck, go to the far left and enter the Doc Room.

After this conversation, you will enter Chapter 3.
Chapter 3: An Extraordinary Voyage
Go right from where you start and you’ll find a letter lying between a petroglyph and a barrel. Pick it up to initiate a side mission.

Next, interact with the barrel and move it as far right as it can go. Stand on top of it and then climb up to the higher ledge.
Continue climbing up to the next ledge and go right. Drop down the ledges onto the beach to the right and proceed until you find a lift.

You’ll need a tackle to get this to work. Go right and you’ll find the tackle in a broken box to the immediate left of the waterfall.
Keep going right from here to find a second letter lying on the ground, near the marks on the rock.

Return to the lift and use the tackle with the lift to fix it.
Next, you need tie the rope – do this by using the following arrow buttons shown on screen:
Upper-left, Lower-right, Upper-right, Lower-left

Once you’re up top, run right and interact with the wooden hut at the very end of the path to find shelter at last.
After the cutscene, go left and use the lift again, this time to go down.
Go left now, interacting with the strange objects if you wish. Proceed up the ledges and when you reach the light, pick up the object on the ground. Interact with the light to put it out, and then pick up the ‘key’ on the stick.
Go to the thicket-covered petroglyph located a little to the left, and use the machete on it. Next, use the key on the petroglyph.

Go left down the ledges to the first petroglyph you encountered, and use the key on it as well.

Repeat this process with the third petroglyph, located just to the right of the elephant and left of the lift.

Now go right to find a metal toolbox sitting on a table. Use the machete on the toolbox to break it open. Pick up the tools inside.

Now go back up the lift and just after the rope-bridge, you’ll find a ladder going down that’s blocked by some rope. Use your machete on the rope, and then go down the ladder.
Here we find a contraption that can manipulate the ladders. Right now it’s set to the ladder you just came down, so flip the lever once.

Use the handle on the left (next to the upwards-pointing arrow) to raise the left ladder.
Now use the lever again and use the right handle to lower the right ladder. Do this one more time, so that the right ladder is at the lowermost notch.
Then, use the left switch to raise the right ladder and simultaneously lower the left ladder. Do this one more time and you should have a path down to the lower walkway. Climb down the ladder.

Go right to the gap in the walkway and use the tools from your inventory on the broken part of the walkway.
Now go to the far right to find your third and final letter for the Castaway side mission.

The final petroglyph can be found here, to the left of the letter. Use the key on it.
With all four petroglyph blocks in hand, go back to where you found the machete and the key. Just to the left of where the light was, you’ll find a hatch on the ground. Interact with it.

Rotate the set-up counter-clockwise twice, and then swap the upper and lower blocks once to complete this puzzle. Refer to the screenshot below for help.

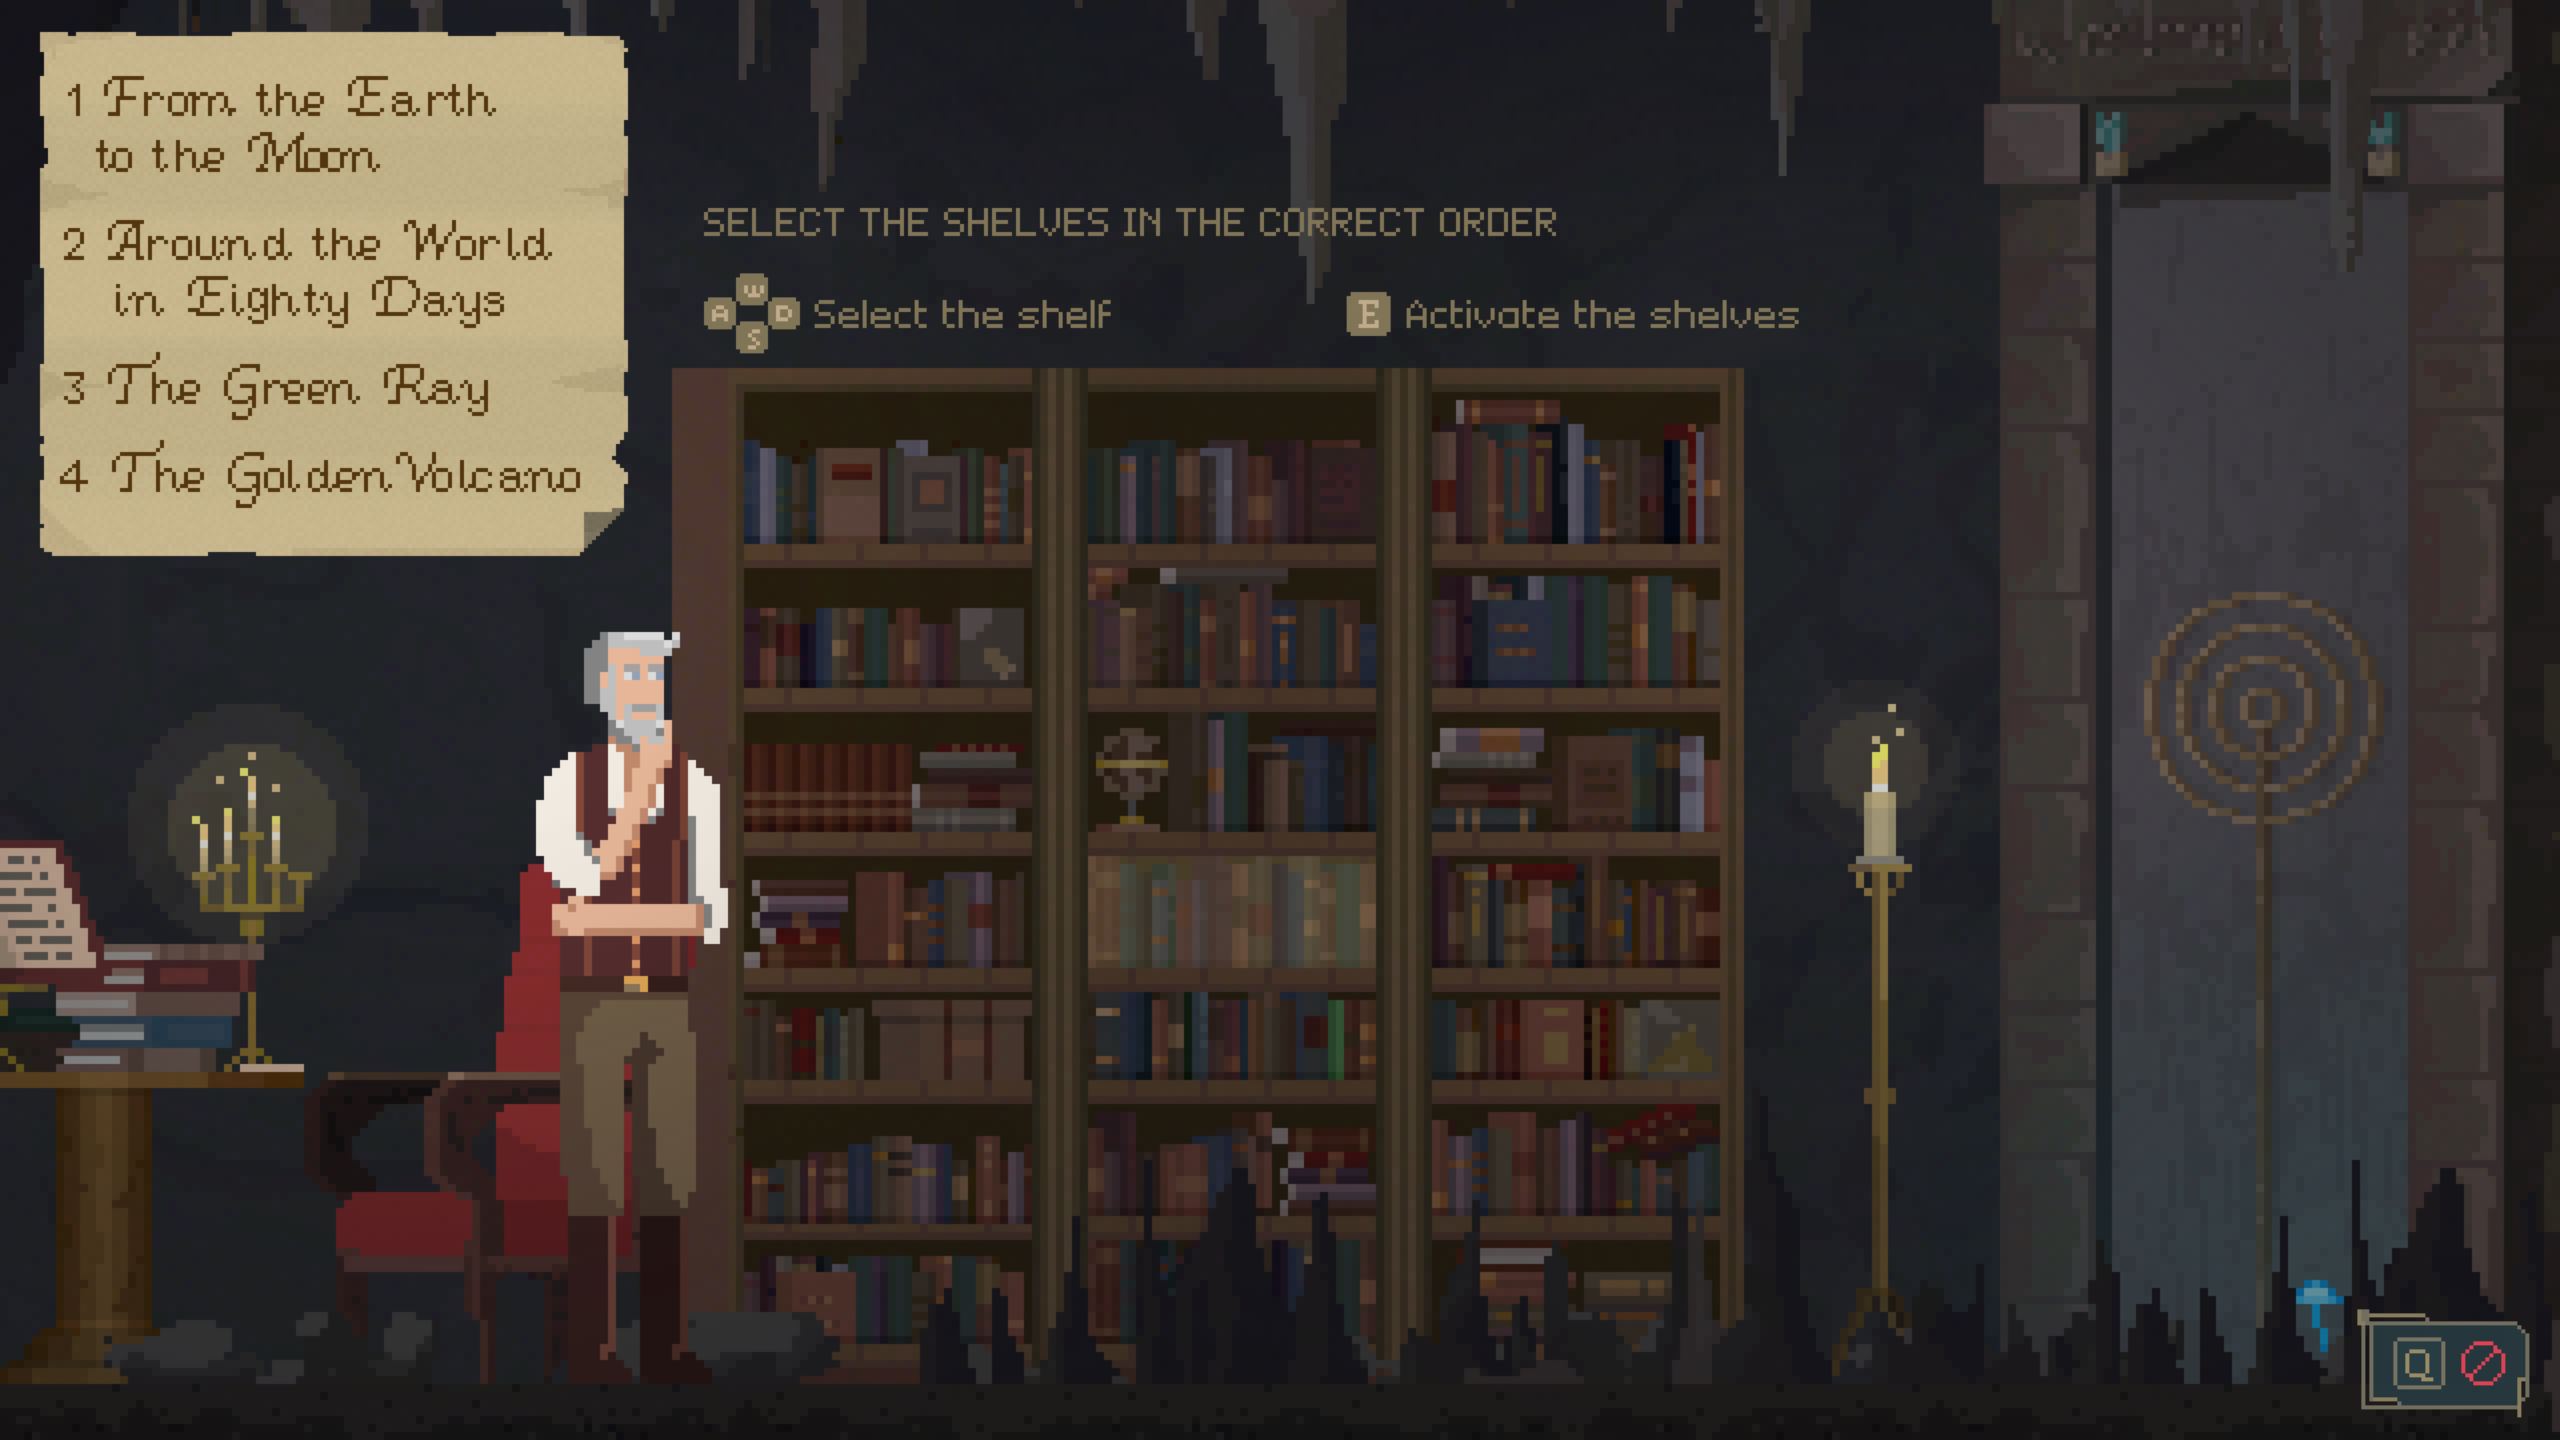
Go down the ladder now and drop down the platforms until Verne comments that he’s trapped. Go to the far right and interact with the bookcase.
For this puzzle, select the shelves in the following order:
- 1. Left bookcase, second from top
- 2. Middle bookcase, third from top
- 3. Middle bookcase, fifth from top
- 4. Right bookcase, fifth from top

This will open up the way ahead, so go right and interact with the artifact.
Go left again to where the platform broke and use the artifact to restore it. Climb up the platform and then proceed climbing up the platforms so that you exit the underground area and return to the island’s surface.

Once up on the surface, run left, down the ledges, and make your way to the far left of this area. When you reach the broken boat, use the artifact on it to restore it and escape the island.
Chapter 3: Aftermath of the Inevitable
After the conversation, exit the Doc Room through the door on the right. After talking to Edrielle, go right and use the elevator there to go up to the Bridge.

Once on the same deck as the Bridge, go left into the Chart Room and interact with the log there. It’s located just to the right of the ladder going down from the Chart Room.

Now use the audiocylinder in the shelf to the immediate right of the logs. The second audiocylinder is in the shelf to the right of that shelf.
For the third audiocylinder, go down the ladder from the Chart Room and go right to the closed door. The audiocylinder is immediately to the left of the closed door.

This will conclude Chapter 3.
Head on to the next part of our walkthrough of Verne: The Shape of Fantasy here!