Mar
Reveil Walkthrough – Chapter 5
Chapters
Check out our Reveil walkthrough on how to complete Chapter 5.
Welcome to the Into Indie Games walkthrough for Reveil.
For more information on Reveil beyond this walkthrough, check out the official website here.
And we are back in the bedroom. Exit the bedroom and head to the living room – which you will notice has been replaced by a stairway heading down into the kitchen. Step through the kitchen into the living room. Go to the right and down to Dorie’s room.

Follow the path through and enter through the blue door at the end. Press the button on the stage when you come upon it.

Go through the blue door on the left. Follow the corridor to the end and enter Martha’s room. Go up the stairs and enter the door where the mirror used to be. Follow the long corridor and turn around when the wall shifts to block your way through. Turn around and you will see a door appear. Go through and you will be in your workshop.

Follow the path till you reach a gap in the wall and crouch through.

Follow the path through and exit through the door at the end. Crouch through and pick up the Ticket Stack from the table with the computers on it.

Go to the monitor and check the screen and unlock the Facility Door.

Turn around and exit the room. You can check the storage room but otherwise head to the right and exit the corridor. Turn to the right and check the document next to the prop sword for some context. Check the various objects in the room and exit the room. You will be in the reception area now. On the left is an exit door, that is locked. Go into the booth on the right and check the monitor and unlock the URD department.

Exit the booth and check the evacuation map on the wall. Move towards the URD department, you can check the VERD department door but its locked.

Check the dead bodies and the file cabinet before finally checking the monitors. Read the Scouting Reports. The other files on the desktop can be read too.

After reading through the files, click on Door Controls and unlock SKULD Department and URD Exit Clearance.

Exit the room and head across to the SKULD Department.

Go around the servers and eventually, you will come across another monitor.

Check the Logs on the desktop for more backstory. Unlock VERD Department and VERD exit clearance as well. Head back out and enter the VERD door. Check out the various tableaus. Go to the back room and pick up the Memory Disk 3. Pick up the Sketch of Dorie from the table. Read the letter on the table and check the monitor. Use the Door Controls to enable SKULD Exit Clearance. Read the files and the emails for more backstory.

Head back out and exit through the right. Follow the path and enter room 3. You will wake up in your original apartment. Pick up the puzzle box on the table.

Turn it around and pull out the small mechanical key. Put it back down and pick up the batteries from around the room. Pick the box back up and turn it to the bottom and insert the Small Mechanical Key.

Open the panel and insert both batteries.

Turn the switch on and close the panel. Turn the box around to the panel with the four buttons sticking out.

Press them all and open the panel to get a Translucent disc. Turn to the slider side now and move the slider in the II column to O.

Next move III to O as well.

Turn to the side with the disc trays and insert the disc we have on the second slot.

Flip around to the side with two buttons on it and press them.

Remove the panel to receive another Translucent disc. Set the slider for IV to Square.

Insert this disc in the 3rd slot. Set the slider for V to the hourglass symbol.

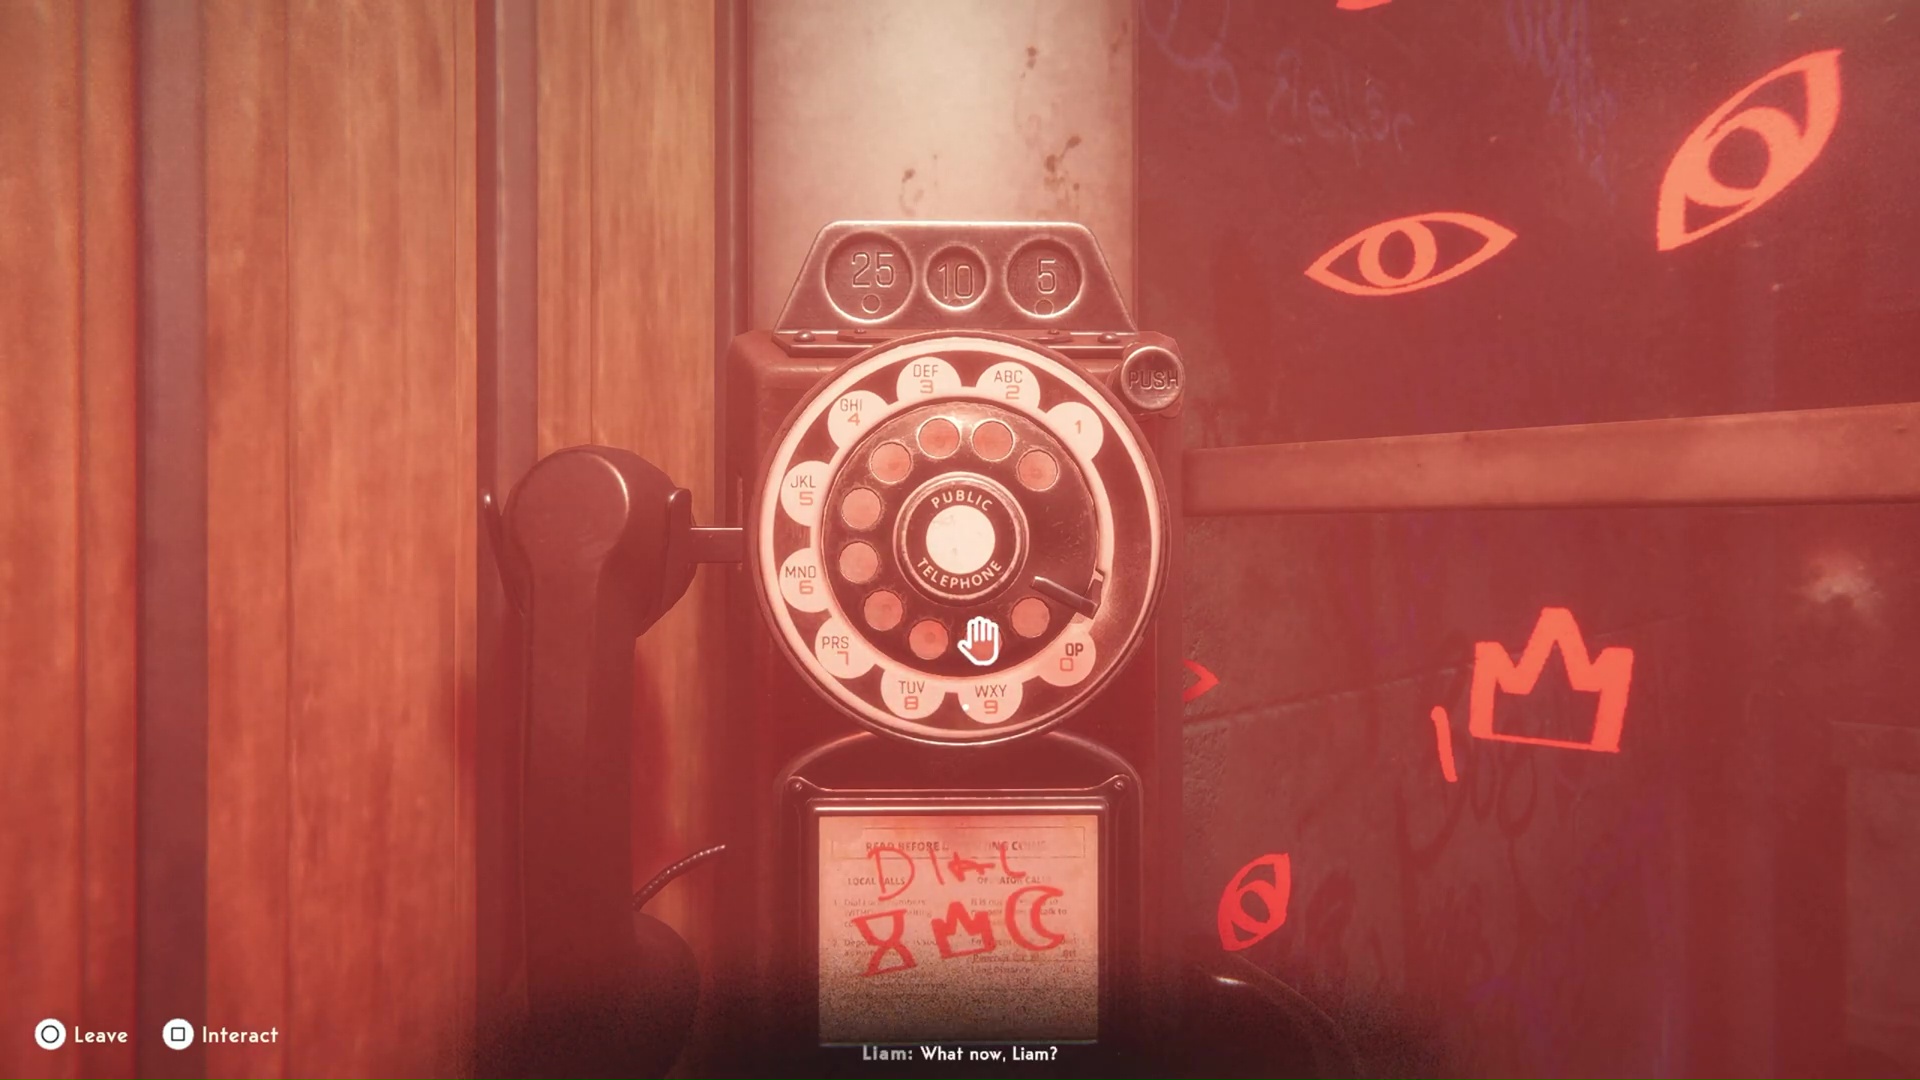
Leave the slider for I and VI at the triangle symbol. Open the panel for the last Translucent disc and enter it in the slot. Now rotate the discs till they form the logo on the cardboard box in front of you. Pick up the strange ticket. Head out the door and follow the alleyway to the laundromat and head to the back. Follow the path to the phone booth and solve the next puzzle.

Look around the booth for the numbers and symbols to align up. Hourglass is 7. Crown is 1 and moon is 8. Dial 718 and the door will open. Take the elevator down and follow the path to the logo for Norn. Move through the room through the cardboard cutouts and eventually use the strange ticket on the door at the end. Enter Room 3. Press the button to start the timer.

Watch the cutscene and when you wake back up head out. Go to the right and then follow the path left. Pick up the Puzzle Sphere. Keep going till you reach the main control room. The power is out. Go through the path on the right, go down the stairs and you will find the generator room. It is marked 1. Once inside, pull out the broken capacitor.

Go back up and through the door on the other side and enter the room marked 2.

Check the capacitors here, until you find an intact one. Go back and replace it on the generator. Power will come back now. In the main control room, check the monitor to reboot the entire system. Leave the console room and head towards the exit. On the table on your left, read the letter from Dr. Ian and pick up his key card.

Go to the table on the right and you will see a gun and another letter. Head back to the console room. You can pick up another Disc drive from the console on the wall on the left. Uncouple the disc drive and you have the option of inserting the disc pack you choose.

Pick up the sticky note password from the console.

Initiate the system and you will see you need to administer some drugs and prime some equipment. Go back out to the table with the gun on it and pick up the 3,4,5 – Trimethoxyamphetamine.

Turn around and open the MCS Module 01.

Turn all the switches on. Next open the NVFS module below.

Rotate the switches till the graph merges and flatlines. Next open the R&C module.

This is a timing puzzle. Press Power to set up the first orange bar, press SET to stop the white bar on top of it to move to the next light. Reset each time you get it right and do it 3 times.

Next open the EDR module.

Set it up like the picture below – for the last slider set it to 0.

Open the RFC module next and insert the medication and press PUMP.

Run back to the console and and start the process. Go back to the machine.

Enjoy the ending you chose.
This concludes our walkthrough for Reveil. You can check part 4 here.