Nov
The Last Faith Walkthrough – Part 4
The Last Faith Walkthrough - Table of Contents
- Part 1 (How to beat the Giant Patron and how to get to the City of Mythringal)
- Part 2 (How to beat the Cold One Shielder, find Nighttide's Rout and explore the City of Mythringal)
- Part 3 (Explore the City of Mythringal.)
- Part 4 (Explore the Federal Inquistion area and how to fight the Winged Pale Lament)
- Part 5 (How to fight Dr. Ridley Hermann, explore a bit of the Osseus Fortress and where to find the Moonshade Charm)
- Part 6 (How to fight Edwynn, the Shadowscrouge Horror and explore the Drowned Crypt.)
- Part 7 (How to fight Starborn Nighthunter and explore the City of Erlim)
- Part 8 (How to fight Leena and Yegor, Find the Propulsion boots and explore the Esk Mansion)
- Part 9 (How to fight the Burnt Apostle and explore the Liturgical Pass)
- Part 10 (How to fight the Voracious Terror and explore the Osseus Fortress and the beginning of Tynewill Village)
- Part 11 (How to fight the second Starborn Nighthunter and explore more of Tynewill Village)
- Part 12 (How to fight Manfredd the Accused and explore Ordens Palace)
- Part 13 (How to unlock the Graveyard and how to fight the Cold One Beast)
- Part 14 (How to fight Leena for the second time and location of all twenty Unborn of the Midnight Aristocracy)
- Part 15 (How to fight Lord Patryk Laddak and Annabella & Caterina)
Demo Coverage -
Check out our walkthrough for The Last Faith to explore the Federal Inquistion area and how to fight the Winged Pale Lament.
Welcome to the Into Indie Games walkthrough for The Last Faith!
For more information on The Last Faith beyond this walkthrough, check out the official website here. You can also check our coverage of the extended demo here.
Enter through the open doorway after the ominously large gate.

Save at the checkpoint and move forward. Go past the lift and into the next room. Get on the table and kill the enemies on the table, taking care not to fall off the table.

In the next room pick up the Static Pastilles and drop down the ladder. Head left at the bottom but be careful of the electrified puddles. Keep going past the ladder to the end of the corridor to pick up Magnetic Bombs.

Go down the ladder and kill the enemies there. Be careful of the puddles and head to the room on the left. There is a Necrogash here, be wary of his nightmare balls; if they hit you, it will reverse your controls. Kill the Necrogash and head through the door on the left. Pick up the healing injections on the far left, beyond the elevator. Ignore the elevator for now. Head back to the previous room and go up the ladder.


Go up the ladders, avoiding the puddles moving towards the left of the room. Hit the switch at the end and activate the lever as well. This will open the door at the top where we came down the ladder in the first place. Get on the lift and go right at the top. Go across the tables now and past the ladder and into the doorway you just opened. Head down the stairs now.

Follow the path down into the bedroom. Take out the Necrogash and go up the ladder. Take out the enemies there. Move around this floor and pick up the Magnetic Powders and Healing Injections. Head to the right and head up the stairs.

At the top go to the right and you should enter a balcony. Kill the enemies here and rush through to the other side. You will find a boss marker/checkpoint. Keep heading down the stairs here. At the bottom go to the right and you will arrive in a room with giant presses.

You cannot dodge these. So, head down the ladder here. At the bottom you will find much slower presses. Just shimmy through them. Avoid the puddles and at the end of the room, make your way up. If you get hit too many times with the puddles, you will be electrified. At the top, kill the Necrogashes and go to the right and drop down.

At the bottom go right and you will enter another room with presses. Move through them and at the end you will find the machinery responsible for the presses. Destroy it.

All the presses should have stopped now, so move back to the room you came from and climb up the ladder. At the top, move left through the stopped presses and hit the switch here.

Keep moving left through here and back to the room with the stairs leading up. Head up the stairs and enter the doorway that you just opened. Inside the room, go up the ladder and pick up the Static Pastilles. The door on the right is closed, so head to the door on the left. You should find a permanent checkpoint.

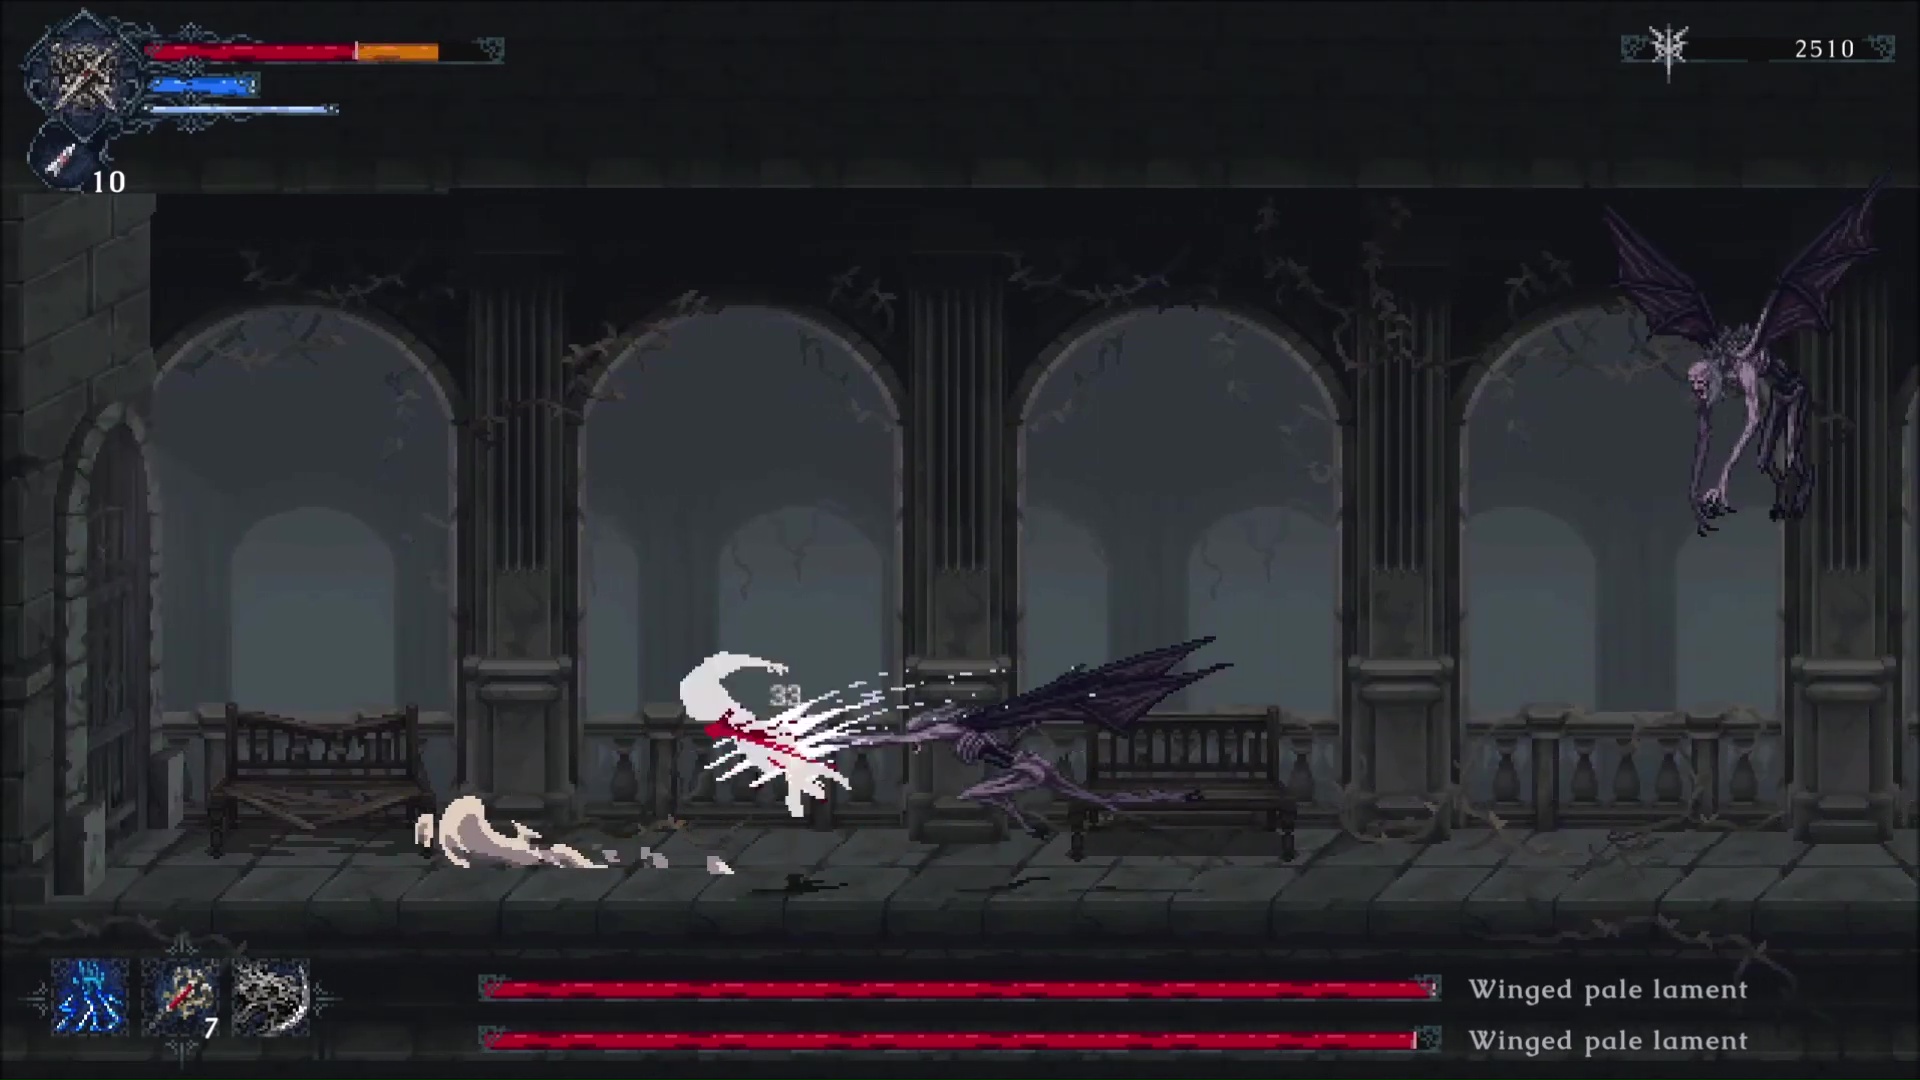
Head to the left and into another long balcony and prepare for a boss fight.
Boss : Winged Pale Lament

These are dual bosses, common in soulslike. The first move they do is a long horizontal slash, this is telegraphed with a glint animation where they sharper their nails.

There is a diagonal attack that comes from the top of the screen. Also, there is a 2 hit slash combo. The diagonal blood attack can also be done straight down.

You will be inflicted with Bleeding if they hit you. My strategy was to hit them with the Lightning offhand weapon, this stuns them from time to time as they have an Electrocution DOT on them. Otherwise, it’s a matter of dodge and attack. Don’t over-commit, as their attack cadence can differ wildly. After you kill them, you can loot Moonsilver stones and Healing Injections. Save the game at the checkpoint on the right.
This concludes Part 4 of our walkthrough for The Last Faith. You can find Part 5 here. (Coming soon!)