Jan
Prince of Persia: The Lost Crown – 100% Walkthrough – Part 11
Prince of Persia: The Lost Crown Walkthrough - Table of Contents
- Part 1 - Prologue - The Battle of Perseoplis
- Part 2 - Lost in Mount Qaf - Lower City
- Part 3 - Lost in Mount Qaf - Hyrcanian Forest
- Part 4 - Lost in Mount Qaf - Path to the Citadel
- Part 5 - The Abducted Prince - Sacred Archives
- Part 6 - The Abducted Prince - Upper City
- Part 7 - The Tiger and the Rat - The Depths
- Part 8 - The Path to the Sand Prison - The Depths
- Part 9 - The Path to the Sand Prison - Sunken Harbor and Soma Tree
- Part 10 - The Path to the Sand Prison - Temple of Knowledge
- Part 11 - The Darkest of Souls - Pit of Eternal Sands
- Part 12 - The Celestial Guardians - The Sunken Harbor and Raging Sea
- Part 13 - The Celestial Guardians - Upper City West
- Part 14 - The Celestial Guardians - Upper City East
- Part 15 - Return to the Past - Upper City Day/Night
- Part 16 - Father and Son - Soma Tree
- Part 17 - Father and Son - Tower of Silence - Part 1
- Part 18 - Father and Son - Tower of Silence - Part 2
- Part 19 - Crossroads of Time - Darius' Palace
Check out our walkthrough of Prince of Persia: The Lost Crown to progress through the Pit of Eternal Sands and how to beat Azhdaha.
Welcome to the Into Indie Games walkthrough for Prince of Persia: The Lost Crown walkthrough.
For more information on Prince of Persia: The Lost Crown beyond this walkthrough, check out the official website here.
Head to the left from the fast travel point at the Sunken Harbor – towards the Wak-Wak tree. Save and then exit the area. Drop down in the next area and take the out the enemy once you reach the bottom.

Head to the right from the above point on the map. Drop down and pick up the Amulet Holder (3/9) for the Achievement: Glory of Faravahar. Exit the area through the right and use your chakram on the elevator you find next. Get off at its lowest point and go to the left. Drop down and go around to exit this area. In the next area, use your Dimensional Claw to pick up the exploding plant as you enter.

Get up on the wooden platforms and switch dimensions to solidify the platform here.

Get up and use Charged Attack to break the seal. Move to the left once the seal is broken and you will eventually come to a blocked off path that you need to use the stored exploding plant on.

Blow it up and get to the wooden platform and use a charged attack to break the second seal. Drop down the pit and the Quest: The Path to the Sand Prison will be completed. The Quest: The Darkest of Souls will start. Go to the left from where you just landed to find a Time Crystal. You need to jump up the falling sands here.

After picking up the crystals, go up the falling sands here and move to the left. Drop down the first sand fall, dash across to the second one and go up it – then dash to the third one, drop down and dash to the fourth one – if you drop down here before landing on the ledge on the opposite side, you can pick up some time crystals.

The way out is to dash to the third sand fall and go up. If you go up the fourth sand fall and wall jump off at the top and go around you can find some more time crystals in a secret room at the very top.

Drop back down to the path with the pillars and head to the left and kill the enemy that spawns. Go to the left and exit the area. There will be a floating spell caster here, take him out with arrows. Go up the platforms and to the left and go around to find another Wak-Wak tree. Keep heading left and around to get higher and kill the enemy here.

Pick up the glowing ball here with Dimensional Claw and head down. Go down the opening in the middle of this area.

Take out the enemy here and use the exploding ball in your dimensional claw to open this path.

Keep going through here to fight Alternate Sargon again. The fight goes the same way as before. Take him out and pick up the exploding rock with your dimensional claw. As well as the Athra Surge: Soul of Gilgamesh. Head back out and take out the enemies as you head to the right. Keep going to the right and downwards to find the Lore Item: Enormous Tooth of Azdaha. If you slide to the left of where you pick this up, you can find some time crystals.

Keep going to the right and you will come across a locked gate with an annoying enemy on the other side. Jump over the cell and on to the other side. Take out the spell caster and the sword wielder in the enclosed space here.

Use the exploding rock we picked up earlier to open up the seal to pick up an Azure Damascus Ingot (6/20) here. Kill the enemy here as well. Go around the top and drop down and head to the right to exit this area. In the next area, drop down the sand fall and head to the right and keep going down. Once at the bottom, head to the right up the stairs. In the next area, kill the half snake enemy here and go up to pick up an exploding rock with Dimensional Claw. Keep heading to the right and drop down, follow the wind to find your next Wak-Wak tree, but before heading down the wooden platforms hit the wall on the left for a secret room.

You will find a Sand Vial here (9/30). Head back out and drop down and you will meet the Old Man again. Head to the right and drop down to find another purple Time Anomaly orb here, destroy it to restore the fast travel point. Save at the Wak-Wak tree next, you will find Kaya here for the Achievement: Tree of Life. Go to the left and drop down the sand fall, follow the seal’s trail up the walls and keep going left.

Go up the sand fall, avoiding the giant centipede here and then move to the left. You can find a few time crystals around the sand falls here, but they aren’t worth the trouble. Just keep moving to the left, till the centipede clears a way for you and exit the area.

In the next area, go down the sand fall and go to the right at the first intersection and drop to pick up a Xerxes coin.

After picking it up, drop down and dash across and hide here – by jumping in place till the centipede passes you by.

Go up, wait for the centipede to pass you by and land on the left to make sure you have the Xerxes coin. Now head to the left, avoiding the centipedes by jumping in place on the sands. Once there, head to the left and up to find a secret room with a Sand Vial. Be careful there is a trap right in front of the vial, just dash through to avoid getting smashed.

If you head to the right from here, there is another Xerxes coin (11/47) in the location in the map below. Just avoid the centipedes – be patient and learn their movement and it isn’t that difficult.

If you don’t want the challenge just go around and up to land on this location on the map for the seal.

Smash the seal to open the door and exit through. Go up the sand fall and head to the right to exit this area. Get back to the Wak-Wak tree and then head left from that point. Drop down to the very bottom and follow the seal trails to the right.

In the next room, jump up the wall on the far left – this will trigger a trap so move quick – as you need to use the pillars trying to crush you as ledges. Go up and across and to the right. Use the traps as they trigger and keep heading right. You can eventually pick up a Lore Item: Legend from the Pit at the bottom of a sand fall.

Keep going to the right and you can pick up an exploding rock with dimensional claw. Use it to blow up the path in the floor to the left of where you picked up the exploding rock.

Go back and pick up another exploding stone when it respawns and then fall down the hole you just opened to meet Fariba to buy the map for this area. Get out and go up to find a Wak-Wak tree and the fast travel point. Then exit the area to the left.

Keep running to the left, avoiding the traps. Speed is of the essence here, you will need a few tries but learn the path and you will be through in no time. Go up and around the traps to find the seal, smash it and then head to the left through the exit. You will be back at Kaya’s Wak-Wak tree. Now head to the location on the map below to find the pit opened.

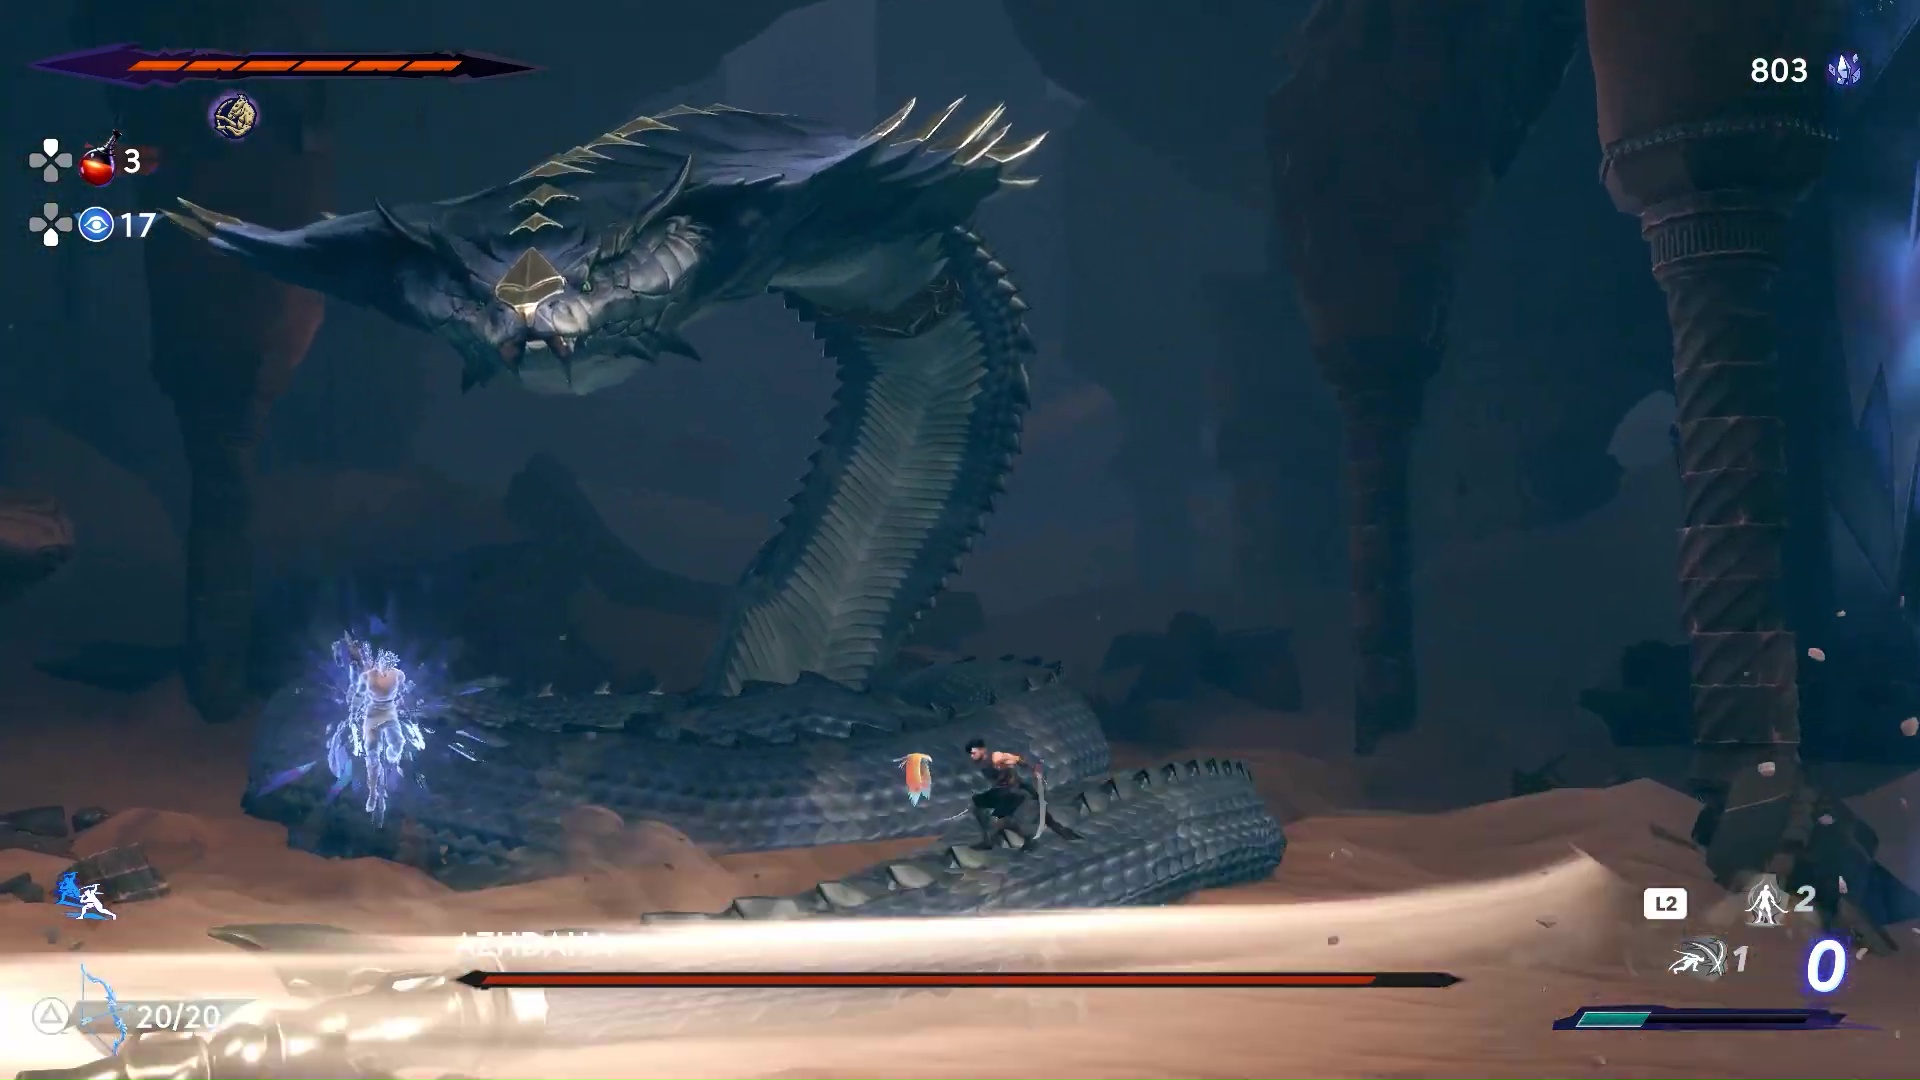
Drop down the pit and prepare for a boss fight.
Boss: Azhdaha

He does a frontal smash. It cannot be parried, so dodge to the right or left and while his head is down, dash to either side and get some hits in. Teleporting is your friend in this fight. Set up crystalized versions of yourself to get better positioning.

He does a tail swipe that you need to jump over.

He does a tail swipe and a frontal head smash. He does the tail swipe first, then the head smash. Jump up and pick a side to dash to.

He goes up for a beam attack. Set up a teleport point right under his head and when the beam passes the crystalized version of you, teleport there to get some hits in.

He summons 5 balls of fire. These balls drop at different speeds, so set up a teleport point and hope you get lucky with the timing. Otherwise tank the hit.

He summons homing missiles next. Dodge or parry them.

At 75% health Phase 2 starts. He does a special parry-able attack, when his eyes glow yellow.

His tail erupts from underneath you, this isn’t telegraphed well. So just keep dashing around.

The tail then starts spinning and starts shooting missiles. Parry these to get some damage dealt.

He does a two hit frontal smash. Dodge both. The second attack has a windup so adjust accordingly.

He does the laser breath attack again, but this time crystals form where his breath lands.

Killing Azhdaha will get you the Achievement: Snake in the Sand. This will complete the Quest: The Darkest of Souls and start the Quest: The Celestial Guardians. If you head to the left you can pick up a Soma Flower. Keep going to summon the first Guardian. Go back to Azhdaha to get the Simurgh Power – Gravity Wings. Exit the area to find the old man or Alkara again. Keep going to find a Wak-Wak tree. Save here.

This concludes Part 11 of our Prince of Persia: The Lost Crown walkthrough. You can find Part 12 of our walkthrough for the Price of Persia: The Lost Crown here. And you can find Part 10 of our Prince of Persia: The Lost Crown walkthrough here.